Tips and Tricks
This part of the wxPython tutorial covers some tips and tricks in wxPython.
Tips and Tricks
last modified January 10, 2023
In this section we will show various interesting tips in wxPython. Here we will see examples that could not be put elsewhere.
Interactive Button
When we enter the area of the button widget with a mouse pointer, wx.EVT_ENTER_WINDOW event is generated. Similarly, wx.EVT_LEAVE_WINDOW event is generated, when we leave the area of the widget. We bind two methods to these events.
#!/usr/bin/python
’’' ZetCode wxPython tutorial
This example shows an interactive button.
author: Jan Bodnar website: www.zetcode.com last modified: July 2020 ’''
import wx from wx.lib.buttons import GenButton
class Example(wx.Frame):
def __init__(self, *args, **kwargs):
    super(Example, self).__init__(*args, **kwargs)

    self.InitUI()

def InitUI(self):

    panel = wx.Panel(self)

    btn = GenButton(panel, label='Button',
        pos=(100, 100))
    btn.SetBezelWidth(1)
    btn.SetBackgroundColour('DARKGREY')

    wx.EVT_ENTER_WINDOW(btn, self.OnEnter)
    wx.EVT_LEAVE_WINDOW(btn, self.OnLeave)

    self.SetSize((300, 200))
    self.SetTitle('Interactive button')
    self.Centre()
    self.Show(True)

def OnEnter(self, e):

    btn = e.GetEventObject()
    btn.SetBackgroundColour('GREY79')
    btn.Refresh()

def OnLeave(self, e):

    btn = e.GetEventObject()
    btn.SetBackgroundColour('DARKGREY')
    btn.Refresh()
def main():
ex = wx.App()
Example(None)
ex.MainLoop()
if name == ‘main’: main()
We have used a GenButton instead of a basic wx.Button.
from wx.lib.buttons import GenButton
The GenButton is located in the wx.lib.buttons module.
btn.SetBezelWidth(1)
The SetBezelWidth() method creates some 3D effect on the button.
def OnEnter(self, e):
btn = e.GetEventObject()
btn.SetBackgroundColour('GREY79')
btn.Refresh()
In reaction to the wx.EVT_ENTER_WINDOW, we change the background colour of the button.
Isabelle
When an error occurs in an application, an error dialog usually appears. This might get annoying. I have noticed a better solution in a SAP system. When a user enters an invalid command, statusbar turns red and an error message is displayed on stausbar. The red colour catches the eye and the user can easily read the error message. The following code mimics this situation.
#!/usr/bin/python
Isabelle
import wx
ID_TIMER = 1 ID_EXIT = 2 ID_ABOUT = 3 ID_BUTTON = 4
class Isabelle(wx.Frame): def init(self, parent, id, title): wx.Frame.init(self, parent, id, title)
    self.timer = wx.Timer(self, ID_TIMER)
    self.blick = 0

    file = wx.Menu()
    file.Append(ID_EXIT, '&Quit\tCtrl+Q', 'Quit Isabelle')

    help = wx.Menu()
    help.Append(ID_ABOUT, '&About', 'O Programe')

    menubar = wx.MenuBar()
    menubar.Append(file, '&File')
    menubar.Append(help, '&Help')
    self.SetMenuBar(menubar)

    toolbar = wx.ToolBar(self, -1)
    self.tc = wx.TextCtrl(toolbar, -1, size=(100, -1))
    btn = wx.Button(toolbar, ID_BUTTON, 'Ok', size=(40, 28))

    toolbar.AddControl(self.tc)
    toolbar.AddSeparator()
    toolbar.AddControl(btn)
    toolbar.Realize()
    self.SetToolBar(toolbar)

    self.Bind(wx.EVT_BUTTON, self.OnLaunchCommandOk, id=ID_BUTTON)
    self.Bind(wx.EVT_MENU, self.OnAbout, id=ID_ABOUT)
    self.Bind(wx.EVT_MENU, self.OnExit, id=ID_EXIT)
    self.Bind(wx.EVT_TIMER, self.OnTimer, id=ID_TIMER)

    self.panel = wx.Panel(self, -1, (0, 0), (500 , 300))
    self.panel.SetBackgroundColour('GRAY')
    self.sizer=wx.BoxSizer(wx.VERTICAL)
    self.sizer.Add(self.panel, 1, wx.EXPAND)
    self.SetSizer(self.sizer)
    self.statusbar = self.CreateStatusBar()
    self.statusbar.SetStatusText('Welcome to Isabelle')
    self.Centre()
    self.Show(True)

def OnExit(self, event):
    dlg = wx.MessageDialog(self, 'Are you sure to quit Isabelle?',
        'Please Confirm', wx.YES_NO | wx.NO_DEFAULT | wx.ICON_QUESTION)
    if dlg.ShowModal() == wx.ID_YES:
        self.Close(True)

def OnAbout(self, event):
    dlg = wx.MessageDialog(self, 'Isabelle\t\n' '2004\t', 'About',
	 wx.OK | wx.ICON_INFORMATION)
    dlg.ShowModal()
    dlg.Destroy()

def OnLaunchCommandOk(self, event):
    input = self.tc.GetValue()
    if input == '/bye':
        self.OnExit(self)
    elif input == '/about':
        self.OnAbout(self)
    elif input == '/bell':
        wx.Bell()
    else:
        self.statusbar.SetBackgroundColour('RED')
        self.statusbar.SetStatusText('Unknown Command')
        self.statusbar.Refresh()
        self.timer.Start(50)

    self.tc.Clear()

def OnTimer(self, event):
    self.blick = self.blick + 1
    if self.blick == 25:
        self.statusbar.SetBackgroundColour('#E0E2EB')
        self.statusbar.Refresh()
        self.timer.Stop()
        self.blick = 0
app = wx.App() Isabelle(None, -1, ‘Isabelle’) app.MainLoop()
There is a wx.TextCtrl on the Statusbar. There you enter your commands. We have defined three commands: /bye, /about, and /beep. If you mistype any of them, Statusbar turns red and displays an error. This is done with the wx.Timer class.
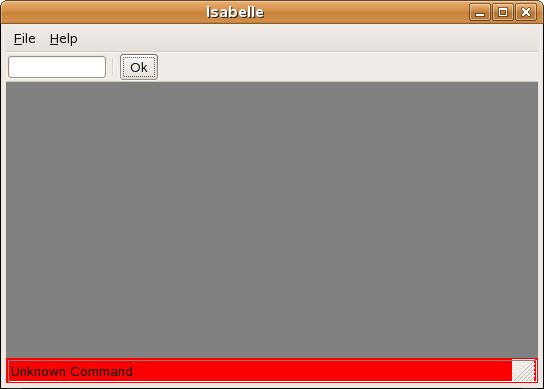
Figure: Isabelle
Undo/Redo framework
Many applications have the ability to undo and redo the user’s actions. The following example shows how it can be accomplished in wxPython.

Figure: Undo/Redo
#!/usr/bin/python
undoredo.py
from wx.lib.sheet import * import wx
stockUndo = [] stockRedo = []
ID_QUIT = 10 ID_UNDO = 11 ID_REDO = 12 ID_EXIT = 13
ID_COLSIZE = 80 ID_ROWSIZE = 20
class UndoText: def init(self, sheet, text1, text2, row, column): self.RedoText = text2 self.row = row self.col = column self.UndoText = text1 self.sheet = sheet
def undo(self):
    self.RedoText = self.sheet.GetCellValue(self.row, self.col)
    if self.UndoText ==  None:
        self.sheetSetCellValue('')
    else: self.sheet.SetCellValue(self.row, self.col, self.UndoText)

def redo(self):
    if self.RedoText == None:
        self.sheet.SetCellValue('')
    else: self.sheet.SetCellValue(self.row, self.col, self.RedoText)
class UndoColSize: def init(self, sheet, position, size): self.sheet = sheet self.pos = position self.RedoSize = size self.UndoSize = ID_COLSIZE
def undo(self):
    self.RedoSize = self.sheet.GetColSize(self.pos)
    self.sheet.SetColSize(self.pos, self.UndoSize)
    self.sheet.ForceRefresh()

def redo(self):
    self.UndoSize = ID_COLSIZE
    self.sheet.SetColSize(self.pos, self.RedoSize)
    self.sheet.ForceRefresh()
class UndoRowSize: def init(self, sheet, position, size): self.sheet = sheet self.pos = position self.RedoSize = size self.UndoSize = ID_ROWSIZE
def undo(self):
    self.RedoSize = self.sheet.GetRowSize(self.pos)
    self.sheet.SetRowSize(self.pos, self.UndoSize)
    self.sheet.ForceRefresh()

def redo(self):
    self.UndoSize = ID_ROWSIZE
    self.sheet.SetRowSize(self.pos, self.RedoSize)
    self.sheet.ForceRefresh()
class MySheet(CSheet): instance = 0 def init(self, parent): CSheet.init(self, parent) self.SetRowLabelAlignment(wx.ALIGN_CENTRE, wx.ALIGN_CENTRE) self.text = '’
def OnCellChange(self, event):
    toolbar = self.GetParent().toolbar
    if (toolbar.GetToolEnabled(ID_UNDO) == False):
            toolbar.EnableTool(ID_UNDO, True)
    r = event.GetRow()
    c = event.GetCol()
    text = self.GetCellValue(r, c)
    # self.text - text before change
    # text - text after change
    undo = UndoText(self, self.text, text, r, c)
    stockUndo.append(undo)

    if stockRedo:
        # this might be surprising, but it is a standard behaviour
        # in all spreadsheets
        del stockRedo[:]
        toolbar.EnableTool(ID_REDO, False)

def OnColSize(self, event):
    toolbar = self.GetParent().toolbar

    if (toolbar.GetToolEnabled(ID_UNDO) == False):
            toolbar.EnableTool(ID_UNDO, True)

    pos =  event.GetRowOrCol()
    size = self.GetColSize(pos)
    undo = UndoColSize(self, pos, size)
    stockUndo.append(undo)

    if stockRedo:
        del stockRedo[:]
        toolbar.EnableTool(ID_REDO, False)

def OnRowSize(self, event):
    toolbar = self.GetParent().toolbar
    if (toolbar.GetToolEnabled(ID_UNDO) == False):
            toolbar.EnableTool(ID_UNDO, True)

    pos =  event.GetRowOrCol()
    size = self.GetRowSize(pos)
    undo = UndoRowSize(self, pos, size)

    stockUndo.append(undo)
    if stockRedo:
        del stockRedo[:]
        toolbar.EnableTool(ID_REDO, False)
class Newt(wx.Frame): def init(self,parent,id,title): wx.Frame.init(self, parent, -1, title, size=(550, 500))
    box = wx.BoxSizer(wx.VERTICAL)
    menuBar = wx.MenuBar()
    menu = wx.Menu()
    quit = wx.MenuItem(menu, ID_QUIT, '&Quit\tCtrl+Q', 'Quits Newt')
    quit.SetBitmap(wx.Bitmap('icons/exit16.png'))
    menu.AppendItem(quit)
    menuBar.Append(menu, '&File')
    self.Bind(wx.EVT_MENU, self.OnQuitNewt, id=ID_QUIT)
    self.SetMenuBar(menuBar)

    self.toolbar = wx.ToolBar(self, id=-1, style=wx.TB_HORIZONTAL | wx.NO_BORDER |
                                    wx.TB_FLAT | wx.TB_TEXT)
    self.toolbar.AddSimpleTool(ID_UNDO, wx.Bitmap('icons/undo.png'),
          'Undo', '')
    self.toolbar.AddSimpleTool(ID_REDO, wx.Bitmap('icons/redo.png'),
          'Redo', '')
    self.toolbar.EnableTool(ID_UNDO, False)

    self.toolbar.EnableTool(ID_REDO, False)
    self.toolbar.AddSeparator()
    self.toolbar.AddSimpleTool(ID_EXIT, wx.Bitmap('icons/exit.png'),
          'Quit', '')
    self.toolbar.Realize()
    self.toolbar.Bind(wx.EVT_TOOL, self.OnUndo, id=ID_UNDO)
    self.toolbar.Bind(wx.EVT_TOOL, self.OnRedo, id=ID_REDO)
    self.toolbar.Bind(wx.EVT_TOOL, self.OnQuitNewt, id=ID_EXIT)

    box.Add(self.toolbar, border=5)
    box.Add((5,10), 0)

    self.SetSizer(box)
    self.sheet1 = MySheet(self)
    self.sheet1.SetNumberRows(55)
    self.sheet1.SetNumberCols(25)

    for i in range(self.sheet1.GetNumberRows()):
        self.sheet1.SetRowSize(i, ID_ROWSIZE)

    self.sheet1.SetFocus()
    box.Add(self.sheet1, 1, wx.EXPAND)
    self.CreateStatusBar()
    self.Centre()
    self.Show(True)

def OnUndo(self, event):
    if len(stockUndo) == 0:
        return

    a = stockUndo.pop()
    if len(stockUndo) == 0:
        self.toolbar.EnableTool(ID_UNDO, False)

    a.undo()
    stockRedo.append(a)
    self.toolbar.EnableTool(ID_REDO, True)

def OnRedo(self, event):
    if len(stockRedo) == 0:
        return

    a = stockRedo.pop()
    if len(stockRedo) == 0:
        self.toolbar.EnableTool(ID_REDO, False)

    a.redo()
    stockUndo.append(a)

    self.toolbar.EnableTool(ID_UNDO, True)

def OnQuitNewt(self, event):
    self.Close(True)
app = wx.App() Newt(None, -1, ‘Newt’) app.MainLoop()
stockUndo = []
stockRedo = []
There are two list objects. stockUndo is a list that holds all changes that we can undo. The stockRedo keeps all changes that can be redone. The changes are instantiated into a UndoText object. This object has two methods: undo and redo.
class MySheet(CSheet): def init(self, parent): CSheet.init(self, parent)
Our example inherits from CSheet class. It is a grid widget with some additional logic.
self.SetRowLabelAlignment(wx.ALIGN_CENTRE, wx.ALIGN_CENTRE)
Here we center the labels in rows. By default, they are aligned to the right.
r = event.GetRow() c = event.GetCol() text = self.GetCellValue(r, c)
self.text - text before change
text - text after change
undo = UndoText(self, self.text, text, r, c) stockUndo.append(undo)
Every time we do some changes, an UndoText object is created and appended to the stockUndo list..
if stockRedo: # this might be surprising, but it is a standard behaviour # in all spreadsheets del stockRedo[:] toolbar.EnableTool(ID_REDO, False)
Basically, if we undo some changes and then start typing again, all redo changes are lost. OpenOffice Calc works this way, Gnumeric as well.
if len(stockUndo) == 0: self.toolbar.EnableTool(ID_UNDO, False) … self.toolbar.EnableTool(ID_REDO, True)
The undo and redo buttons are enabled or disabled accordingly. If there is nothing to undo, the undo button is disabled.
a = stockUndo.pop() if len(stockUndo) == 0: self.toolbar.EnableTool(ID_UNDO, False)
a.undo() stockRedo.append(a)
If we click undo, we pop up an UndoText object from the stockUndo list. Call the undo() method and append the object to the stockRedo list.
Configuring application settings
Many applications allow users to configure their settings. Users can toggle tooltips on and of, change fonts, default download paths etc. Mostly they have a menu option called preferences. Application settings are saved to the hard disk, so that users do not have to change the settings each time the application starts.
In wxPython we have wx.Config class to do our job.
On Linux, settings are stored in a simple hidden file. This file is located in the home user directory by default. The location of the configuration file can be changed. The name of the file is specified in the constructor of the wx.Config class. In the following code example, we can cofigure the size of the window. If there is no configuration file, the height and the width of the window is set to the defaul 250px value. We can set these values to a range from 200 - 500px. After we save our values and restart the application, the window size is set to our preffered values.
#!/usr/bin/python
myconfig.py
import wx
class MyConfig(wx.Frame): def init(self, parent, id, title): self.cfg = wx.Config(‘myconfig’) if self.cfg.Exists(‘width’): w, h = self.cfg.ReadInt(‘width’), self.cfg.ReadInt(‘height’) else: (w, h) = (250, 250) wx.Frame.init(self, parent, id, title, size=(w, h))
    wx.StaticText(self, -1, 'Width:', (20, 20))
    wx.StaticText(self, -1, 'Height:', (20, 70))
    self.sc1 = wx.SpinCtrl(self, -1, str(w), (80, 15), (60, -1), min=200, max=500)
    self.sc2 = wx.SpinCtrl(self, -1, str(h), (80, 65), (60, -1), min=200, max=500)
    wx.Button(self, 1, 'Save', (20, 120))

    self.Bind(wx.EVT_BUTTON, self.OnSave, id=1)
    self.statusbar = self.CreateStatusBar()
    self.Centre()
    self.Show(True)

def OnSave(self, event):
    self.cfg.WriteInt("width", self.sc1.GetValue())
    self.cfg.WriteInt("height", self.sc2.GetValue())
    self.statusbar.SetStatusText('Configuration saved, %s ' % wx.Now())
app = wx.App() MyConfig(None, -1, ‘myconfig.py’) app.MainLoop()
Here we have the contents of a configuration file to our code example. It consists of two key, value pairs.
$ cat .myconfig height=230 width=350

Figure: MyConfig
Mouse gestures
A mouse gesture is a way of combining computer mouse movements and clicks which the software recognizes as a specific command. We can find mouse gestures in such applications like Firefox or Opera. They help users save their time while browsing on the Interent. Mouse gestures are created with wx.lib.gestures.MouseGestures class in wxPython.
Available gestures:
-
L for left
-
R for right
-
U for up
-
D for down
-
7 for northwest
-
9 for northeast
-
1 for southwest
-
3 for southeast
If you wonder why these numbers were chosen, have a look at the numerical pad. Mouse gestures can be combined. This way ‘RDLU’ is a mouse gesture triggered, when we do a square with a mouse pointer.
Possible flags are:
-
wx.MOUSE_BTN_LEFT
-
wx.MOUSE_BTN_MIDDLE
-
wx.MOUSE_BTN_RIGHT
#!/usr/bin/python
mousegestures.py
import wx import wx.lib.gestures as gest
class MyMouseGestures(wx.Frame):
def __init__ (self, parent, id, title):
    wx.Frame.__init__(self, parent, id, title, size=(300, 200))

    panel = wx.Panel(self, -1)
    mg = gest.MouseGestures(panel, True, wx.MOUSE_BTN_LEFT)
    mg.SetGesturePen(wx.Colour(255, 0, 0), 2)
    mg.SetGesturesVisible(True)
    mg.AddGesture('DR', self.OnDownRight)

    self.Centre()
    self.Show(True)

def OnDownRight(self):
      self.Close()
app = wx.App() MyMouseGestures(None, -1, ‘mousegestures.py’) app.MainLoop()
In our example, we have registered a mouse gesture for a panel. Mouse gesture is triggered, when a left button is pressed and we go down and right with a cursor. As in letter ‘L’. Our mouse gesture will close the application.
mg = gest.MouseGestures(panel, True, wx.MOUSE_BTN_LEFT)
If we want to use mouse gestures, we have to create a MouseGesture object. The first parameter is a window, where the mouse gesture is registered. Second parameter defines a way to register a gesture. True is for automatic, False for manual. Manual is not fully implemented and we are happy with the automatic way. Last parameter defines a mouse button, which will be pressed when triggering gestures. The button can be later changed with the SetMouseButton() method.
mg.SetGesturePen(wx.Colour(255, 0, 0), 2)
Our gestures will be painted as red lines. They will be 2 pixels wide.
mg.SetGesturesVisible(True)
We set this gesture visible with the SetGesturesVisible() method.
mg.AddGesture(‘DR’, self.OnDownRight)
We register a mouse gesture with the AddGesture() method. The first parameter is the gesture. Second parameter is the method triggered by the gesture.
In this chapter, we presented some tips in wxPython.

